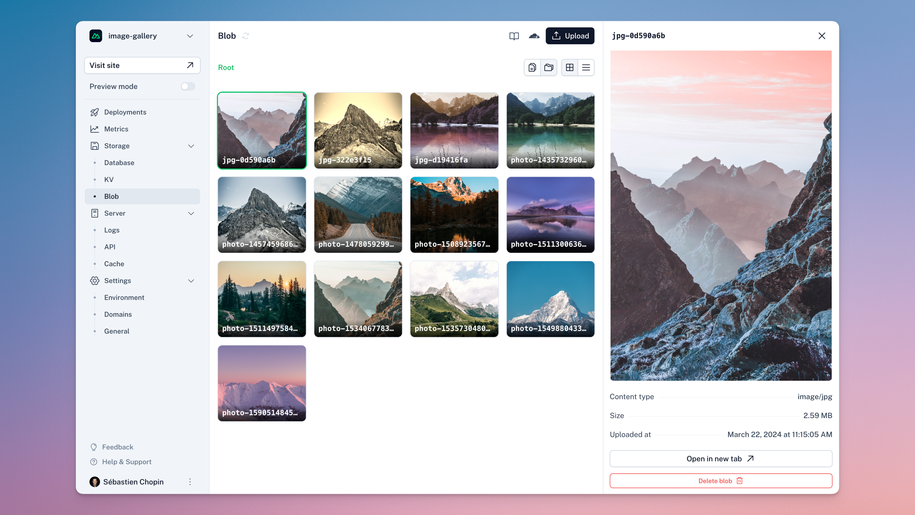
Blob 存储
入门
通过在 nuxt.config.ts 文件中将 blob 属性添加到 hub 对象中,在您的 NuxtHub 项目中启用 Blob 存储。
export default defineNuxtConfig({
  hub: {
    blob: true
  }
})

hubBlob()
返回一组用于操作 Blob 存储的方法的服务器可组合函数。
list()
返回 Blob 的分页列表(仅元数据)。
export default eventHandler(async () => {
  const { blobs } = await hubBlob().list({ limit: 10 })

  return blobs
})
参数
列表选项。
返回值
返回 BlobListResult。
serve()
返回 Blob 的数据并设置 Content-Type、Content-Length 和 ETag 标头。
export default eventHandler(async (event) => {
  const { pathname } = getRouterParams(event)

  return hubBlob().serve(event, pathname)
})
您还可以设置 Content-Security-Policy 标头以添加额外的安全层。
export default eventHandler(async (event) => {
  const { pathname } = getRouterParams(event)

  setHeader(event, 'Content-Security-Policy', 'default-src \'none\';')
  return hubBlob().serve(event, pathname)
})
参数
处理程序的事件,需要设置标头。
要提供的 Blob 的名称。
返回值
返回 Blob 的原始数据并设置 Content-Type 和 Content-Length 标头。
head()
返回 Blob 的元数据。
const metadata = await hubBlob().head(pathname)
参数
要提供的 Blob 的名称。
返回值
返回 BlobObject。
get()
返回 Blob 主体。
const blob = await hubBlob().get(pathname)
参数
要提供的 Blob 的名称。
返回值
返回 Blob 或如果未找到则返回 null。
put()
将 Blob 上传到存储。
export default eventHandler(async (event) => {
  const form = await readFormData(event)
  const file = form.get('file') as File

  if (!file || !file.size) {
    throw createError({ statusCode: 400, message: 'No file provided' })
  }

  ensureBlob(file, {
    maxSize: '1MB',
    types: ['image']
  })

  return hubBlob().put(file.name, file, {
    addRandomSuffix: false,
    prefix: 'images'
  })
})
查看 Vue 端的示例
<script setup lang="ts">
async function uploadImage (e: Event) {
  const form = e.target as HTMLFormElement

  await $fetch('/api/files', {
    method: 'POST',
    body: new FormData(form)
  }).catch((err) => alert('Failed to upload image:\n'+ err.data?.message))

  form.reset()
}
</script>

<template>
  <form @submit.prevent="uploadImage">
    <label>Upload an image: <input type="file" name="image"></label>
    <button type="submit">
      Upload
    </button>
  </form>
</template>
参数
要提供的 Blob 的名称。
Blob 的数据。
放置选项。任何其他提供的字段都将存储在 Blob 的元数据中。
返回值
返回 BlobObject。
del()
使用其路径名删除 Blob。
export default eventHandler(async (event) => {
  const { pathname } = getRouterParams(event)

  await hubBlob().del(pathname)

  return sendNoContent(event)
})
您还可以通过提供路径名数组来一次删除多个 Blob。
await hubBlob().del(['images/1.jpg', 'images/2.jpg'])
delete() 方法作为 del() 的别名。参数
要提供的 Blob 的名称。
返回值
不返回值。
handleUpload()
这是一个“一体化”功能,用于通过检查其大小和类型来验证 Blob 并将其上传到存储。
useUpload() Vue 可组合函数一起使用。它可以用于处理 API 路由中的文件上传。
export default eventHandler(async (event) => {
  return hubBlob().handleUpload(event, {
    formKey: 'files', // read file or files form the `formKey` field of request body (body should be a `FormData` object)
    multiple: true, // when `true`, the `formKey` field will be an array of `Blob` objects
    ensure: {
      contentType: ['image/jpeg', 'images/png'], // allowed types of the file
    },
    put: {
      addRandomSuffix: true
    }
  })
})
参数
要从中读取文件的表单键。默认值为 'files'。
当为 true 时,formKey 字段将是一个 Blob 对象数组。
有关更多详细信息,请参阅 ensureBlob() 选项。
有关更多详细信息,请参阅 put() 选项。
返回值
返回 BlobObject 或如果 multiple 为 true 则返回 BlobObject 数组。
如果 file 不满足要求,则抛出错误。
handleMultipartUpload()
处理请求以支持分段上传。
export default eventHandler(async (event) => {
  return await hubBlob().handleMultipartUpload(event)
})
[action] 和 [...pathname] 参数。在客户端,您可以使用 useMultipartUpload() 可组合函数以分段上传文件。
<script setup lang="ts">
async function uploadFile(file: File) {
  const upload = useMultipartUpload('/api/files/multipart')

  const { progress, completed, abort } = upload(file)
}
</script>
useMultipartUpload()。参数
Blob 的内容类型。
Blob 的内容长度。
如果为 true,则将向 Blob 的名称添加随机后缀。默认为 false。
createMultipartUpload()
handleMultipartUpload() 方法来处理分段上传请求。启动新的分段上传。
export default eventHandler(async (event) => {
  const { pathname } = getRouterParams(event)

  const mpu = await hubBlob().createMultipartUpload(pathname)

  return {
    uploadId: mpu.uploadId,
    pathname: mpu.pathname,
  }
})
参数
要提供的 Blob 的名称。
放置选项。任何其他提供的字段都将存储在 Blob 的元数据中。
返回值
返回 BlobMultipartUpload
resumeMultipartUpload()
handleMultipartUpload() 方法来处理分段上传请求。继续处理未完成的分段上传。
要上传分段上传的一部分,您可以使用 uploadPart() 方法
export default eventHandler(async (event) => {
  const { pathname } = getRouterParams(event)
  const { uploadId, partNumber } = getQuery(event)

  const stream = getRequestWebStream(event)!
  const body = await streamToArrayBuffer(stream, contentLength)

  const mpu = hubBlob().resumeMultipartUpload(pathname, uploadId)
  return await mpu.uploadPart(partNumber, body)
})
通过调用 complete() 方法完成上传
export default eventHandler(async (event) => {
  const { pathname, uploadId } = getQuery(event)
  const parts = await readBody(event)

  const mpu = hubBlob().resumeMultipartUpload(pathname, uploadId)
  return await mpu.complete(parts)
})
如果您要取消上传,则需要调用 abort() 方法
export default eventHandler(async (event) => {
  const { pathname } = getRouterParams(event)
  const { uploadId } = getQuery(event)

  const mpu = hubBlob().resumeMultipartUpload(pathname, uploadId)
  await mpu.abort()

  return sendNoContent(event)
})
客户端使用上述路由进行分段上传的简单示例
async function uploadLargeFile(file: File) {
  const chunkSize = 10 * 1024 * 1024 // 10MB

  const count = Math.ceil(file.size / chunkSize)
  const { pathname, uploadId } = await $fetch(
    `/api/files/multipart/${file.name}`,
    { method: 'POST' },
  )

  const uploaded = []

  for (let i = 0; i < count; i++) {
    const start = i * chunkSize
    const end = Math.min(start + chunkSize, file.size)
    const partNumber = i + 1
    const chunk = file.slice(start, end)

    const part = await $fetch(
      `/api/files/multipart/${pathname}`,
      {
        method: 'PUT',
        query: { uploadId, partNumber },
        body: chunk,
      },
    )

    uploaded.push(part)
  }

  return await $fetch(
    '/api/files/multipart/complete',
    {
      method: 'POST',
      query: { pathname, uploadId },
      body: { parts: uploaded },
    },
  )
}
参数
要提供的 Blob 的名称。
分段上传的上传 ID。
返回值
返回 BlobMultipartUpload
参数
要处理的事件。
createCredentials()
创建临时访问凭据,这些凭据可以选择性地限定为前缀或对象。
用于从客户端创建预签名 URL 以将文件上传到 R2 (查看示例)。
--remote 标志的开发环境中可用。// Create credentials with default permission & scope (admin-read-write)
const credentials = await hubBlob().createCredentials()
// Limit the scope to a specific object & permission
const credentials = await hubBlob().createCredentials({
permission: 'object-read-write',
pathnames: ['only-this-file.png']
})
详细了解 创建预签名 URL 以将文件上传到 R2。
参数
创建凭据的选项。
返回值
返回包含以下属性的对象
{
  accountId: string
  bucketName: string
  accessKeyId: string
  secretAccessKey: string
  sessionToken: string
}
ensureBlob()
ensureBlob() 是一个方便的实用程序,用于通过检查其大小和类型来验证 Blob。
// Will throw an error if the file is not an image or is larger than 1MB
ensureBlob(file, { maxSize: '1MB', types: ['image' ]})
参数
要验证的文件。
请注意,至少应提供 maxSize 或 types。
返回值
不返回值。
如果 file 不满足要求,则抛出错误。
Vue 可组合函数
server/ 目录)。useUpload()
useUpload 用于处理 Nuxt 应用程序中的文件上传。
<script setup lang="ts">
const upload = useUpload('/api/blob', { method: 'PUT' })

async function onFileSelect({ target }: Event) {
  const uploadedFiles = await upload(target as HTMLInputElement)

  // file uploaded successfully
}
</script>

<template>
  <input
    accept="jpeg, png"
    type="file"
    name="file"
    multiple
    @change="onFileSelect"
  >
</template>
参数
上传 API 的基本 URL。
可选地,您可以将 Fetch 选项传递给请求。详细了解 Fetch API 此处。
返回值
返回一个 MultipartUpload 函数,该函数可用于以分段上传文件。
const { completed, progress, abort } = upload(file)
const data = await completed
useMultipartUpload()
应用程序可组合函数,用于创建分段上传助手。
export const mpu = useMultipartUpload('/api/files/multipart')
参数
由 handleMultipartUpload() 处理的分段上传 API 的基本 URL。
分段上传助手的选项。
返回值
返回一个 MultipartUpload 函数,该函数可用于以分段上传文件。
const { completed, progress, abort } = mpu(file)
const data = await completed
类型
BlobObject
interface BlobObject {
  pathname: string
  contentType: string | undefined
  size: number
  httpEtag: string
  uploadedAt: Date
  httpMetadata: Record<string, string>
  customMetadata: Record<string, string>
}
BlobMultipartUpload
export interface BlobMultipartUpload {
  pathname: string
  uploadId: string
  uploadPart(
    partNumber: number,
    value: string | ReadableStream<any> | ArrayBuffer | ArrayBufferView | Blob
  ): Promise<BlobUploadedPart>
  abort(): Promise<void>
  complete(uploadedParts: BlobUploadedPart[]): Promise<BlobObject>
}
BlobUploadedPart
export interface BlobUploadedPart {
  partNumber: number;
  etag: string;
}
MultipartUploader
export type MultipartUploader = (file: File) => {
  completed: Promise<SerializeObject<BlobObject> | undefined>
  progress: Readonly<Ref<number>>
  abort: () => Promise<void>
}
BlobListResult
interface BlobListResult {
  blobs: BlobObject[]
  hasMore: boolean
  cursor?: string
  folders?: string[]
}
示例
使用分页列出 Blob
export default eventHandler(async (event) => {
  const { limit, cursor } = await getQuery(event)

  return hubBlob().list({
    limit: limit ? Number.parseInt(limit) : 10,
    cursor: cursor ? cursor : undefined
  })
})
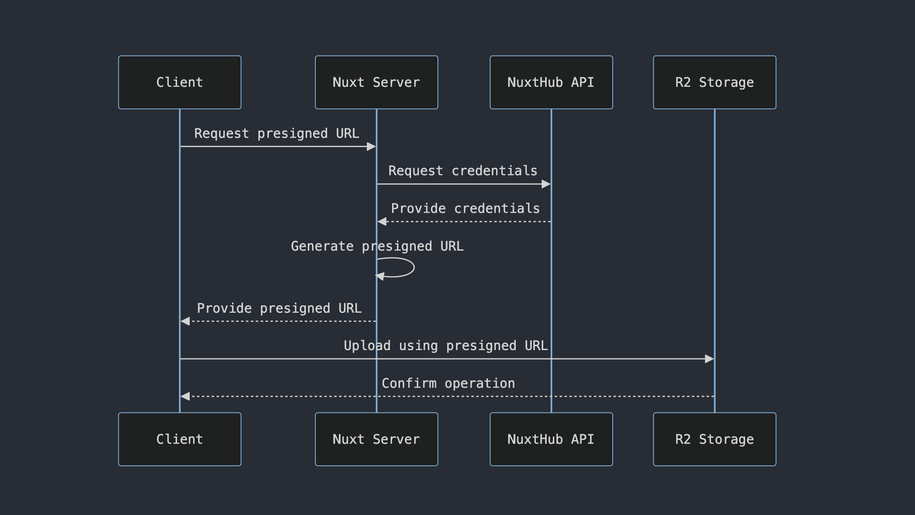
创建预签名 URL 以将文件上传到 R2
预签名 URL 可用于从客户端将文件上传到 R2,而无需使用 API 密钥。

由于我们使用 aws4fetch 来签名请求,并使用 zod 来验证请求,因此我们需要安装这些包
npx nypm i aws4fetch zod
首先,我们需要创建一个 API 路由,它将向客户端返回一个预签名的 URL。
import { z } from 'zod'
import { AwsClient } from 'aws4fetch'

export default eventHandler(async (event) => {
  const { pathname } = await getValidatedRouterParams(event, z.object({
    pathname: z.string().min(1)
  }).parse)
  // Create credentials with the right permission & scope
  const blob = hubBlob()
  const { accountId, bucketName, ...credentials } = await blob.createCredentials({
    permission: 'object-read-write',
    pathnames: [pathname]
  })
  // Create the presigned URL
  const client = new AwsClient(credentials)
  const endpoint = new URL(
    pathname,
    `https://${bucketName}.${accountId}.r2.cloudflarestorage.com`
  )
  const { url } = await client.sign(endpoint, {
    method: 'PUT',
    aws: { signQuery: true }
  })
  // Return the presigned URL to the client
  return { url }
})
接下来,我们需要创建一个 Vue 页面,使用预签名的 URL 将文件上传到我们的 R2 存储桶。
<script setup lang="ts">
async function uploadWithPresignedUrl(file: File) {
  const { url } = await $fetch(`/api/blob/sign/${file.name}`)
  await $fetch(url, {
    method: 'PUT',
    body: file
  })
}
</script>

<template>
  <input type="file" @change="uploadWithPresignedUrl($event.target.files[0])">
</template>
在此阶段,您将收到 CORS 错误,因为我们没有在 R2 存储桶上设置 CORS。
要在我们的 R2 存储桶上设置 CORS
- 使用
npx nuxthub manage在 NuxtHub 管理员中打开项目 - 转到 **Blob 选项卡**(确保您位于正确的环境:生产或预览)
- 点击右上角的 Cloudflare 图标
- 在 Cloudflare 中,转到 R2 存储桶的
设置选项卡 - 滚动到 **CORS 策略**
- 点击
编辑 CORS 策略 - 按照以下示例,使用您的来源更新允许的来源
[
  {
    "AllowedOrigins": [
      "https://:3000",
      "https://my-app.nuxt.dev"
    ],
    "AllowedMethods": [
      "GET",
      "PUT"
    ],
    "AllowedHeaders": [
      "*"
    ]
  }
]
- 保存更改
就是这样!您现在可以使用预签名的 URL 将文件上传到 R2。
