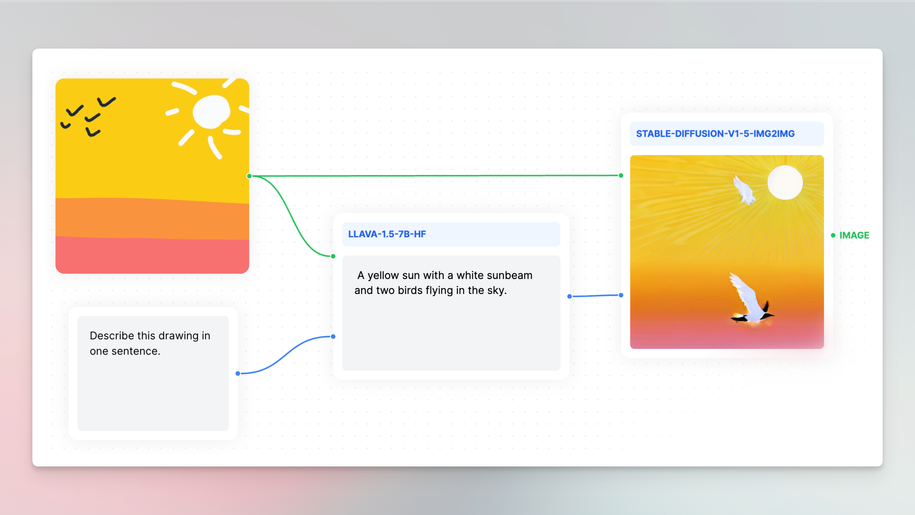
使用 Cloudflare AI 模型提升用户体验
简介
让我们来改进 Atidraw,这是一个使用 Nuxt 制作的开源协作绘图应用程序。
该应用程序具有基本功能,例如
- 基于
nuxt-auth-utils的 Google、GitHub 或匿名登录身份验证 - 使用
signature_pad绘图 - 使用
hubBlob()上传和存储使用 Cloudflare R2 的绘图
您可以在 draw.nuxt.dev 上试用它。
Cloudflare AI 价格
了解 Cloudflare AI 模型的计费方式很重要。
Cloudflare 的免费配额允许任何人每天免费使用总计 10,000 个神经元。
神经元是 Cloudflare 用于衡量不同模型的 AI 输出的方式。为了让您了解 10,000 个神经元可以实现什么,您可以生成以下内容之一(或等效混合):
- 100-200 个 LLM 响应
- 500 次翻译
- 500 秒的语音转文字音频
- 10,000 次文本分类
- 1,500 - 15,000 个嵌入
达到免费配额后,您可以按使用付费的方式使用 AI 模型,价格为 0.011 美元 / 1,000 个神经元。
将 AI 添加到 Nuxt
要将 AI 添加到我们的 Nuxt 应用程序,我们需要在我们的 nuxt.config.ts 文件中启用 AI 功能。
export default defineNuxtConfig({
  hub: {
    ai: true, // <--- Enable AI
    blob: true,
  }
})
然后,我们要确保我们的项目已链接到我们的 NuxtHub 帐户。
npx nuxthub link
hubAI() 从 Cloudflare 使用 AI 模型。我一直在思考两个功能
- 为用户绘图生成替代文本,提升应用程序的可访问性和 SEO。
- 基于绘图和替代文本生成图像,作为使应用程序更具互动性的方式。
在开始之前,我查看了 Cloudflare 的多模态游乐场 并尝试了一些模型。

这引导我使用以下模型
- LLaVA 用于替代文本生成
- Stable Diffusion IMG2IMG 用于替代绘图生成
图像替代文本
为了生成用户绘图的替代文本,我们使用 LLaVA 模型。
让我们看看我们当前的 /api/upload 路由
export default eventHandler(async (event) => {
  // Make sure the user is authenticated to upload
  const { user } = await requireUserSession(event)

  // Read the form data
  const form = await readFormData(event)
  const drawing = form.get('drawing') as File

  // Make sure the drawing is a jpeg image and is not larger than 1MB
  ensureBlob(drawing, { maxSize: '1MB', types: ['image/jpeg'] })

  // Create a new pathname to be smaller than the last one uploaded (for a desc ordering)
  const name = `${new Date('2050-01-01').getTime() - Date.now()}`
  // Store the image in the R2 bucket with the `drawings/` prefix
  return hubBlob().put(`${name}.jpg`, drawing, {
    prefix: 'drawings/',
    addRandomSuffix: true,
    customMetadata: {
      userProvider: user.provider,
      userId: user.id,
      userName: user.name,
      userAvatar: user.avatar,
      userUrl: user.url,
    },
  })
})
LLaVA 模型需要 Uint8Array 格式的图像和 prompt 来生成替代文本
const { description } = await hubAI().run('@cf/llava-hf/llava-1.5-7b-hf', {
  prompt: 'Describe this drawing in one sentence.',
  // Convert the drawing from File to Uint8Array
  image: [...new Uint8Array(await drawing.arrayBuffer())],
}))
我们可以将描述添加到绘图的自定义元数据中
export default eventHandler(async (event) => {
  // ...
+  const { description } = await hubAI().run('@cf/llava-hf/llava-1.5-7b-hf', {
+    prompt: 'Describe this drawing in one sentence.',
+    image: [...new Uint8Array(await drawing.arrayBuffer())],
+  }))

  // ...
  return hubBlob().put(`${name}.jpg`, drawing, {
    // ...
    customMetadata: {
       // ...
       userUrl: user.url,
+      description
    },
  })
})
最后,我们需要更新我们的列表页面,以在 <img> 标签中显示描述,同时也在 title 属性中显示,以便用户可以在将鼠标悬停在图像上时看到描述。
<script setup lang="ts">
const { data } = await useFetch('/api/drawings')
</script>

<template>
  <div class="grid grid-cols-1 sm:grid-cols-2 lg:grid-cols-3 xl:grid-cols-4 gap-8">
    <div v-for="drawing in data?.blobs" :key="drawing.pathname" class="flex flex-col gap-2">
      <img
        :src="`/drawings/${drawing.pathname}`"
        :alt="drawing.customMetadata.description"
        :title="drawing.customMetadata.description"
      />
      <!-- ... -->
    </div>
  </div>
</template>
让我们看看结果
替代绘图
为了基于绘图和替代文本生成新绘图,我们需要使用 Stable Diffusion IMG2IMG 模型。
await hubAI().run('@cf/runwayml/stable-diffusion-v1-5-img2img', {
  image: imageAsUint8Array,
  prompt: imageAltText,
  guidance: 8,
  strength: 0.5,
})
它需要以下输入
image(作为Uint8Array)用作图像生成参考prompt用来引导模型生成图像guidance用来控制生成的图像在多大程度上遵循给定的文本提示strength用来控制模型更改输入图像的程度,值越高,更改越大。
让我们更新我们的 /api/upload 路由以生成替代绘图并将其存储到我们的 R2 存储桶中。
export default eventHandler(async (event) => {
  // ...

  const aiImage = await hubAI().run('@cf/runwayml/stable-diffusion-v1-5-img2img', {
    prompt: description || 'A drawing',
    guidance: 8,
    strength: 0.5,
    image: [...new Uint8Array(await drawing.arrayBuffer())],
  })
    .then((blob: Blob | Uint8Array) => {
      // Convert Uint8Array to Blob
      if (blob instanceof Uint8Array) {
        blob = new Blob([blob])
      }
      // Store the image in the R2 bucket with the `ai/` prefix
      return hubBlob().put(`${name}.png`, blob, {
        prefix: 'ai/',
        addRandomSuffix: true,
        contentType: 'image/png',
      })
    })

  // ...
  return hubBlob().put(`${name}.jpg`, drawing, {
    // ...
    customMetadata: {
      // ...
      aiImage: aiImage.pathname,
    },
  })
})
如您所见,我们将 AI 生成的图像的 pathname 存储在绘图的自定义元数据中。
现在,当将鼠标悬停在用户的绘图上时,我们可以在列表页面中显示 AI 生成的图像
<script setup lang="ts">
const { data } = await useFetch('/api/drawings')
</script>

<template>
  <div class="grid grid-cols-1 sm:grid-cols-2 lg:grid-cols-3 xl:grid-cols-4 gap-8">
    <div v-for="drawing in data?.blobs" :key="drawing.pathname" class="flex flex-col gap-2">
      <div
          class="group relative max-w-[400px]"
          :title="drawing.customMetadata.description"
        >
          <!-- User drawing -->
          <img
            :src="`/drawings/${drawing.pathname}`"
            :alt="drawing.customMetadata.description"
            class="w-full rounded aspect-1"
            loading="lazy"
          >
          <!-- AI generated image, displayed on hover -->
          <img
            :src="`/drawings/${drawing.customMetadata?.aiImage}`"
            :alt="`AI generated image of ${drawing.customMetadata?.description}`"
            class="w-full rounded aspect-1 absolute inset-0 opacity-0 group-hover:opacity-100"
            loading="lazy"
          >
        </div>
    </div>
  </div>
</template>
我对结果感到很满意
结论
本教程关于如何在 Nuxt 应用程序中使用 Cloudflare AI 模型的介绍到此结束。希望您喜欢本教程,并从中学到了一些关于如何使用 AI 提升可访问性、SEO 或用户体验的想法。
欢迎在该基础上进行扩展,并添加您自己的独特功能,使 Atidraw 成为您的作品!
如果您愿意,也可以通过单击下面的按钮将该项目部署到您的 Cloudflare 帐户
祝您编程和绘图愉快!