代码、绘制、部署:使用 Nuxt 和 Cloudflare R2 的绘图应用
简介
我不会深入讲解每个代码细节,但会尝试解释主要概念以及如何使用 Nuxt 和 Cloudflare R2 构建绘图应用程序。
Atidraw 是一个 Web 应用程序,允许您创建并与全世界分享您的绘画作品。我们的应用程序使用 OAuth 进行用户身份验证,并使用 Cloudflare R2 存储和列出绘画作品。
该应用程序使用 Cloudflare Pages 在 Workers 免费计划上运行,并进行服务器端渲染。
项目依赖项
我们的 Nuxt 应用程序使用以下依赖项
nuxt-auth-utils用于用户身份验证signature_pad用于绘图画布@nuxt/ui用于 UI 组件@nuxthub/core用于 Cloudflare R2 的零配置体验
在我们的 nuxt.config.ts 中,我们需要启用以下模块和选项
export default defineNuxtConfig({
  modules: [
    '@nuxthub/core',
    '@nuxt/ui',
    'nuxt-auth-utils'
  ],
  hub: {
    // Enable Cloudflare R2 storage
    blob: true
  },
})
blob option will use Cloudflare platform proxy in development and automatically create a Cloudflare R2 bucket for your project when you deploy it. It also provides helpers to upload and list files.future.compatibilityVersion: 4 选项来利用 新的目录结构.用户身份验证
对于用户身份验证,我们将使用 nuxt-auth-utils。它提供用于通过 OAuth 提供商对用户进行身份验证的功能,并将用户会话存储在加密的 Cookie 中。
首先,我们需要在 .env 文件中设置一个会话密钥(用于加密和解密会话 Cookie)以及我们的 OAuth 应用程序凭据
NUXT_SESSION_PASSWORD=our_session_secret
NUXT_OAUTH_GITHUB_CLIENT_ID=our_github_client_id
NUXT_OAUTH_GITHUB_CLIENT_SECRET=our_github_client_secret
然后,在 server/auth/github.get.ts 中创建一个服务器路由来处理 OAuth 回调
export default oauthGitHubEventHandler({
  async onSuccess(event, { user }) {
    await setUserSession(event, {
      user: {
        provider: 'github',
        id: String(user.id),
        name: user.name || user.login,
        avatar: user.avatar_url,
        url: user.html_url,
      },
    })

    return sendRedirect(event, '/draw')
  },
})
.get.ts suffix indicates that only GET requests will be handled by this route.当用户访问 /auth/github 时
oauthGitHubEventHandler将用户重定向到 GitHub OAuth 页面- 然后用户将被重定向回 /auth/github
onSuccess()被调用,用户会话被设置在 Cookie 中- 最后,用户被重定向到 /draw
在 app/pages/draw.vue 中,我们可以利用 useUserSession() 来判断用户是否已通过身份验证。
<script setup lang="ts">
const { loggedIn } = useUserSession()
// ...
</script>

<template>
  <DrawPad v-if="loggedIn" @save="save" />
  <UButton v-else to="/auth/github" label="Sign-in with GitHub" external />
</template>
由于我们使用 TypeScript,我们可以通过创建 types/auth.d.ts 文件来为会话对象进行类型化,从而获得自动补全和类型检查
declare module '#auth-utils' {
  interface User {
    provider: 'github' | 'google'
    id: string
    name: string
    avatar: string
    url: string
  }
}
// export is required to avoid type errors
export {}
绘图画布
对于绘图界面,我们将使用 signature_pad 库并在 components/DrawPad.vue 中创建一个新组件
<script setup lang="ts">
import SignaturePad from 'signature_pad'

const emit = defineEmits(['save'])
const canvas = ref()
const signaturePad = ref()

onMounted(() => {
  signaturePad.value = new SignaturePad(canvas.value, {
    penColor: '#030712',
    backgroundColor: '#f9fafb',
  })
})

async function save() {
  const dataURL = signaturePad.value.toDataURL('image/jpeg')
  // Emit the dataURL to the parent component
  emit('save', dataURL)
}
</script>

<template>
  <div class="max-w-[400px]">
    <canvas ref="canvas" class="border rounded-md" />
    <UButton @click="save" />
  </div>
</template>
上传绘画作品
在 app/pages/draw.vue 页面中,我们需要将绘画作品上传到我们的 Cloudflare R2 存储桶。
为此,我们要将从绘图画布接收到的 dataURL 转换为 Blob,然后将 Blob 转换为 File 以指定文件类型和名称。
最后,我们创建一个 FormData 对象,其中包含文件,并将其上传到 /api/upload API 路由。
<script setup lang="ts">
const { loggedIn } = useUserSession()

async function save(dataURL: string) {
  // Transform the dataURL to a Blob
  const blob = await fetch(dataURL).then(res => res.blob())
  // Transform the Blob to a File
  const file = new File([blob], `drawing.jpg`, { type: 'image/jpeg' })
  // Create the form data
  const form = new FormData()
  form.append('drawing', file)

  // Upload the file to the server
  await $fetch('/api/upload', {
    method: 'POST',
    body: form
  })
    .then(() => navigateTo('/'))
    .catch((err) => alert(err.data?.message || err.message))
}
</script>

<template>
  <DrawPad v-if="loggedIn" @save="save" />
  <!-- ... -->
</template>
让我们创建 API 路由以将绘画作品存储在 Cloudflare R2 存储桶中
export default eventHandler(async (event) => {
  // Make sure the user is authenticated to upload
  const { user } = await requireUserSession(event)

  // Read the form data
  const form = await readFormData(event)
  const drawing = form.get('drawing') as File

  // Ensure the file is a jpeg image and is not larger than 1MB
  ensureBlob(drawing, {
    maxSize: '1MB',
    types: ['image/jpeg'],
  })

  // Upload the file to the Cloudflare R2 bucket
  return hubBlob().put(`${Date.now()}.jpg`, drawing, {
    addRandomSuffix: true,
    customMetadata: {
      userProvider: user.provider,
      userId: user.id,
      userName: user.name,
      userAvatar: user.avatar,
      userUrl: user.url,
    },
  })
})
requireUserSession() function is provided by nuxt-auth-utils and will throw a 401 error if the user is not authenticated.如您所见,我们不需要数据库,因为我们将用户元数据存储在 Cloudflare R2 存储桶的自定义元数据中。
hubBlob() 服务器函数,以使用 Cloudflare R2 存储桶。列出绘画作品
现在该列出我们的用户绘画作品了!但是,首先,我们需要在 server/api/drawings.get.ts 中创建一个新的 API 路由
export default eventHandler(async (event) => {
  // Return 100 last drawings
  return hubBlob().list({
    limit: 100
  })
})
然后,我们将在 app/pages/index.vue 中创建一个新页面来列出绘画作品
<script setup lang="ts">
const { data } = await useFetch('/api/drawings')
</script>

<template>
  <div class="grid grid-cols-1 sm:grid-cols-2 lg:grid-cols-3 xl:grid-cols-4 gap-8">
    <div v-for="drawing in data?.blobs" :key="drawing.pathname" class="flex flex-col gap-2">
      <img :src="`/drawings/${drawing.pathname}`" :alt="drawing.pathname" />
      <div class="flex items-center justify-between">
        <span>{{ drawing.customMetadata?.userName }}</span>
        <span class="text-xs text-gray-500">{{ drawing.uploadedAt }}</span>
      </div>
    </div>
  </div>
</template>
绘画作品顺序
您可能已经注意到,最后绘制的绘画作品显示在最后,这是因为 Cloudflare R2 使用字母顺序来列出文件,而我们使用时间戳(使用 Date.now())作为文件名。此外,R2 不支持以自定义顺序列出文件。
尽管使用 hubDatabase() 添加 Cloudflare D1 数据库很容易,但我希望将这个示例保持尽可能简单。
相反,我想到使用 2050 年的时间戳减去绘画作品的时间戳来获得降序排列。虽然不完美,但它很有效,而且 2050 年还很遥远😄。
让我们更新我们的 /api/upload 路由以更新文件名
export default eventHandler(async (event) => {
  // ...

  /**
   * Create a new pathname to be smaller than the last one uploaded
   * So the blob listing will send the last uploaded image at first
   * We use the timestamp in 2050 minus the current timestamp
   * So this project will start to be buggy in 2050, sorry for that
   **/
  const name = `${new Date('2050-01-01').getTime() - Date.now()}`

  // Upload the file to the Cloudflare R2 bucket
  return hubBlob().put(`${name}.jpg`, drawing, {
    // ...
  })
})
现在,我们的最后上传的绘画作品已显示在列表的顶部🚀
绘画作品分页
如果我们有超过 100 幅绘画作品怎么办?我们需要为我们的列表添加分页功能。
The hubBlob().list() accepts a cursor parameter to paginate the results.
让我们更新我们的 API 路由以支持使用 cursor 查询参数进行分页
export default eventHandler(async (event) => {
  const { cursor } = await getQuery<{ cursor?: string }>(event)

  return hubBlob().list({
    limit: 100,
    cursor
  })
})
API 路由返回一个 BlobListResult 对象,其中包含 cursor 和 hasMore 属性
interface BlobListResult {
  blobs: BlobObject[]
  hasMore: boolean
  cursor?: string
  folders?: string[]
}
返回的 cursor 值用于获取下一页的绘画作品(如果 hasMore 为 true)。
我们可以使用 VueUse vInfiniteScroll 指令 来创建无限滚动以加载更多绘画作品。
<script setup lang="ts">
import { vInfiniteScroll } from '@vueuse/components'

const loading = ref(false)
const { data } = await useFetch('/api/drawings', {
  // don't return a shallowRef as we mutate the array in loadMore()
  deep: true,
})

async function loadMore() {
  if (loading.value || !data.value?.hasMore) return
  loading.value = true

  const more = await $fetch(`/api/drawings`, {
    query: { cursor: data.value.cursor },
  })
  data.value.blobs.push(...more.blobs)
  data.value.cursor = more.cursor
  data.value.hasMore = more.hasMore
  loading.value = false
}
</script>


<template>
  <div class="my-8">
    <!-- ... -->
    <div v-if="data?.hasMore" v-infinite-scroll="[loadMore, { distance: 10, interval: 1000 }]">
      <UButton :loading="loading" @click="loadMore">
        {{ loading ? 'Loading more drawings...' : 'Load more drawings' }}
      </UButton>
    </div>
  </div>
</template>
现在,我们拥有了一个分页系统,它会在用户滚动到页面底部时加载更多绘画作品。
部署应用程序
您可以在 免费的 Cloudflare 帐户 和 免费的 NuxtHub 帐户 上托管您的绘图应用程序。
您只需运行一条命令
npx nuxthub deploy
该命令将
- 构建您的 Nuxt 应用程序
- 在您的 Cloudflare 帐户上创建一个新的 Cloudflare Pages 项目
- 预配 Cloudflare R2 存储桶
- 部署您的应用程序
- 为您提供一个使用免费的
<your-app>.nuxt.dev域名访问您的应用程序的 URL。
如果您愿意,也可以通过单击下面的按钮使用 NuxtHub 管理员部署此项目
远程存储
项目部署后,您可以使用 NuxtHub 远程存储 连接到您的预览或生产 Cloudflare R2 存储桶,并在开发环境中使用 --remote 标志
npx nuxt dev --remote
管理绘画作品
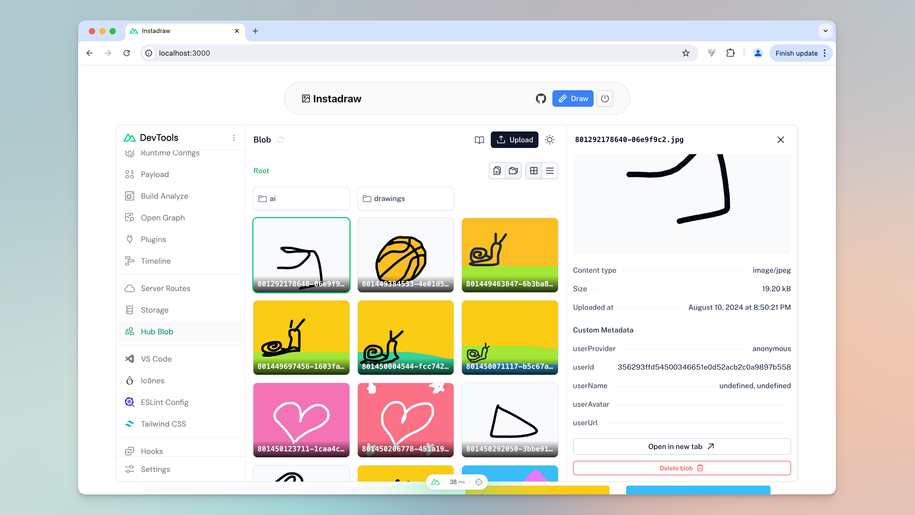
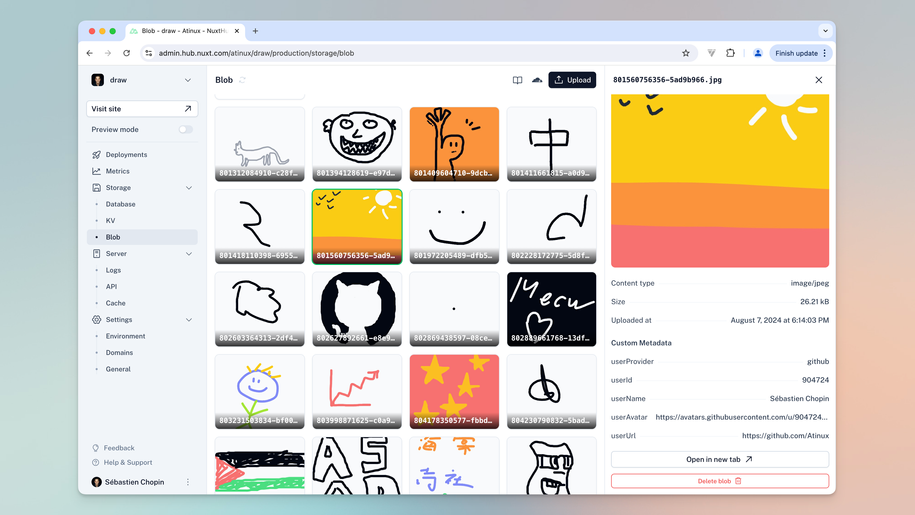
某些用户可能会绘制不适当的绘画作品,我们可能需要将其删除。为此,NuxtHub 在 Nuxt DevTools 和 NuxtHub 管理员中都提供了一个 Blob 面板。
开发
在本地运行您的项目时,您可以打开 Nuxt DevTools
Shift + Option + D快捷键或单击屏幕底部的 Nuxt 徽标- 查找 Hub Blob 选项卡(您也可以使用
CTRL + K打开搜索栏并键入Blob)

生产
您可以使用 NuxtHub 管理员中的 Blob 面板管理所有绘画作品。
部署后,使用以下方法打开应用程序的管理面板
npx nuxthub manage
或者访问 https://admin.hub.nuxt.com 并选择您的项目。

结论
恭喜!您现在已使用 Nuxt 和 Cloudflare R2 构建了一个功能完备的绘图应用程序,用于存储。用户可以创建绘画作品,将其保存到云端,并从任何地方访问它们。
您可以以此为基础进行扩展,并添加您自己的独特功能,让 Atidraw 成为您的专属应用程序!
查看下一篇文章,了解如何利用 Cloudflare AI 为用户绘画作品生成替代文本(可访问性和 SEO),以及如何使用 AI 生成替代绘画作品:Cloudflare AI 为用户体验服务.